
Video Streaming
What is HTTP Live Streaming and How to Test It. Part 2
What is HTTP Live Streaming and How to Test It. Part 2
What is HTTP Live Streaming and How to Test It. Part 2

Serhii Romanov
SDET Manager
•
10 minutes to read
What is HTTP Live Streaming and How to Test It. P. 2
Hello everyone! Following the publication of my first article, I’m back today to cover media file testing. We’ll explore using FFprobe integrated with ChatGPT for analysis, as well as playback and performance testing. Let’s dive right in!
Testing media files
Testing media files, such as .ts (Transport Stream) and .vtt (WebVTT), is often performed using tools such as FFprobe or MediaInfo. These tools allow detecting errors in files that can affect the quality and stability of streaming.
Here are the key aspects that can be checked and analyzed using FFprobe:
Stream Information
Video Streams: Codec type (e.g., H.264), resolution, frame rate, pixel format, and aspect ratio.
Audio Streams: Codec type (e.g., AAC), sampling rate, number of channels, and language metadata.
Subtitle Streams: Format and language, if available.
To obtain stream information, you can run the command:
ffprobe -v error -show_streams input.ts
ffprobe -v error -show_streams input.ts
Overall Integrity of the .ts Media File
Total duration of the media segment, bitrate, and size.
Container-level metadata, such as encoder and creation time.
Command to obtain integrity information:
ffprobe -v error -show_format input.ts
ffprobe -v error -show_format input.ts
Frame-level Analysis
Presentation timestamps (PTS) and decoding timestamps (DTS).
Frame types (I-frames, P-frames, B-frames) and their sequence.
Command to obtain detailed frame information:
ffprobe -v error -select_streams v:0 -show_frames input.ts
ffprobe -v error -select_streams v:0 -show_frames input.ts
Packet-level Analysis
Packet sizes and timestamps.
Efficiency of stream packetization. Command to check packets:
ffprobe -v error -show_packets input.ts
ffprobe -v error -show_packets input.ts
These are just some of the commands you can run for media files using FFprobe. This tool also allows working with almost all types of media files, making it versatile for media testing.
In automated tests, FFprobe can be used in two ways: write your own executor to call the console utility and parse its output, or use ready-made wrappers that provide a convenient interface for working with FFprobe.
Here is an example of a wrapper called ffmpeg-cli-wrapper, which can be used when writing tests in Java. It allows doing everything the console application does.
Here is an example of its usage:
FFprobe ffprobe = new FFprobe("/path/to/ffprobe");
FFmpegProbeResult probeResult = ffprobe.probe("input.mp4");
FFmpegFormat format = probeResult.getFormat();
System.out.format("%nFile: '%s' ; Format: '%s' ; Duration: %.3fs",
 format.filename,
 format.format_long_name,
 format.duration
);
FFmpegStream stream = probeResult.getStreams().get(0);
System.out.format("%nCodec: '%s' ; Width: %dpx ; Height: %dpx",
 stream.codec_long_name,
 stream.width,
 stream.height
);
This example shows how to use FFprobe through ready-made wrappers, simplifying the process of integration and automation of tests. Overall, with such approaches, you can quickly obtain the necessary information about HLS streams and media files, analyze their structure, detect possible errors, and ensure compliance with specifications.
Analyzing Playlists and Media Files Using ChatGPT Integration
Earlier this year, after attending one of the AI conferences, I had the idea to send manifests for verification to ChatGPT. I created a project called hls-ai-analyzer, which I recently uploaded to GitHub. With this project, I want to show how to integrate with the ChatGPT API and send it m3u8 playlists and the results of FFprobe execution for media files to check them for anomalies.
While working on this project, I noticed that ChatGPT works most effectively when given clear and detailed instructions. In my case, the instruction looks like this:
"You are a video streaming analysis program for HLS and DASH. You have to analyze streaming files and find all sorts of anomalies. Use standard RFC-8216 for validation. If you do not find anomalies, then I expect a response: {“status”: “OK”, “message”: “Manifest is correct”}. If you found anomalies, then I expect a response: {“status”: “FAIL”, “message”: “[Add here information about what is wrong in a stream in 200 symbols]”
For me, it was important for ChatGPT to return a response in JSON format so that I could easily map it to an object in Java, so in the instruction, I explicitly stated what response I expect. Such analyzers can then be customized for any needs and tasks. For example, you can try to direct it to a LIVE stream and modify the code to load m3u8 playlists every 5 seconds, download media files, and send all this data to the ChatGPT API for anomaly checking. This approach can allow analyzing streams in real-time, which can help catch complex defects or anomalies.
However, even with automated tests or integration with AI for stream verification, I would still recommend checking playback using different players, which we will discuss next.
Playback Testing
Playback testing involves checking the playback of HLS streams on different devices and browsers. The main goal is to ensure playback stability, adaptability to changing network conditions, and correct content display according to HLS specifications.
Let's consider the main aspects of testing HLS stream playback:
Playback on Different Devices and Platforms
Testing on web browsers (Chrome, Firefox, Safari, Edge).
Testing on mobile devices (iOS, Android).
Testing on Smart TVs, gaming consoles, etc.
ABR (Adaptive Bitrate Streaming)
Check how the video player adapts the stream quality when the internet connection speed changes.
Measure the time it takes to switch between bitrates and its impact on the user experience.
Startup Time and Buffer Loading
Measure the time to display the first frame when starting the video (TTFF).
Check buffering under different network conditions and loads.
Calculate the delay from the original stream in the case of live streaming.
Playback Stability and Error Resilience
Recovery of playback after connection loss or temporary network degradation.
Check behavior in case of failed segment download or HTTP request errors.
Subtitles and Alternative Audio Tracks
Check the correct display of WebVTT (.vtt) subtitles.
Analyze the quality of subtitle placement on the screen.
Check switching between different languages/audio tracks.
DRM (Digital Rights Management) Testing
Check the process of obtaining and processing license keys, including the response time of DRM servers.
Check playback restrictions (e.g., screenshot or screen recording prohibition) according to content security policies.
Analyze player behavior in case of DRM errors, such as the absence of a license or its expiration.
Playback testing of HLS streams is usually performed on the applications being developed, but there are also several players that can help. Let's consider some of them:
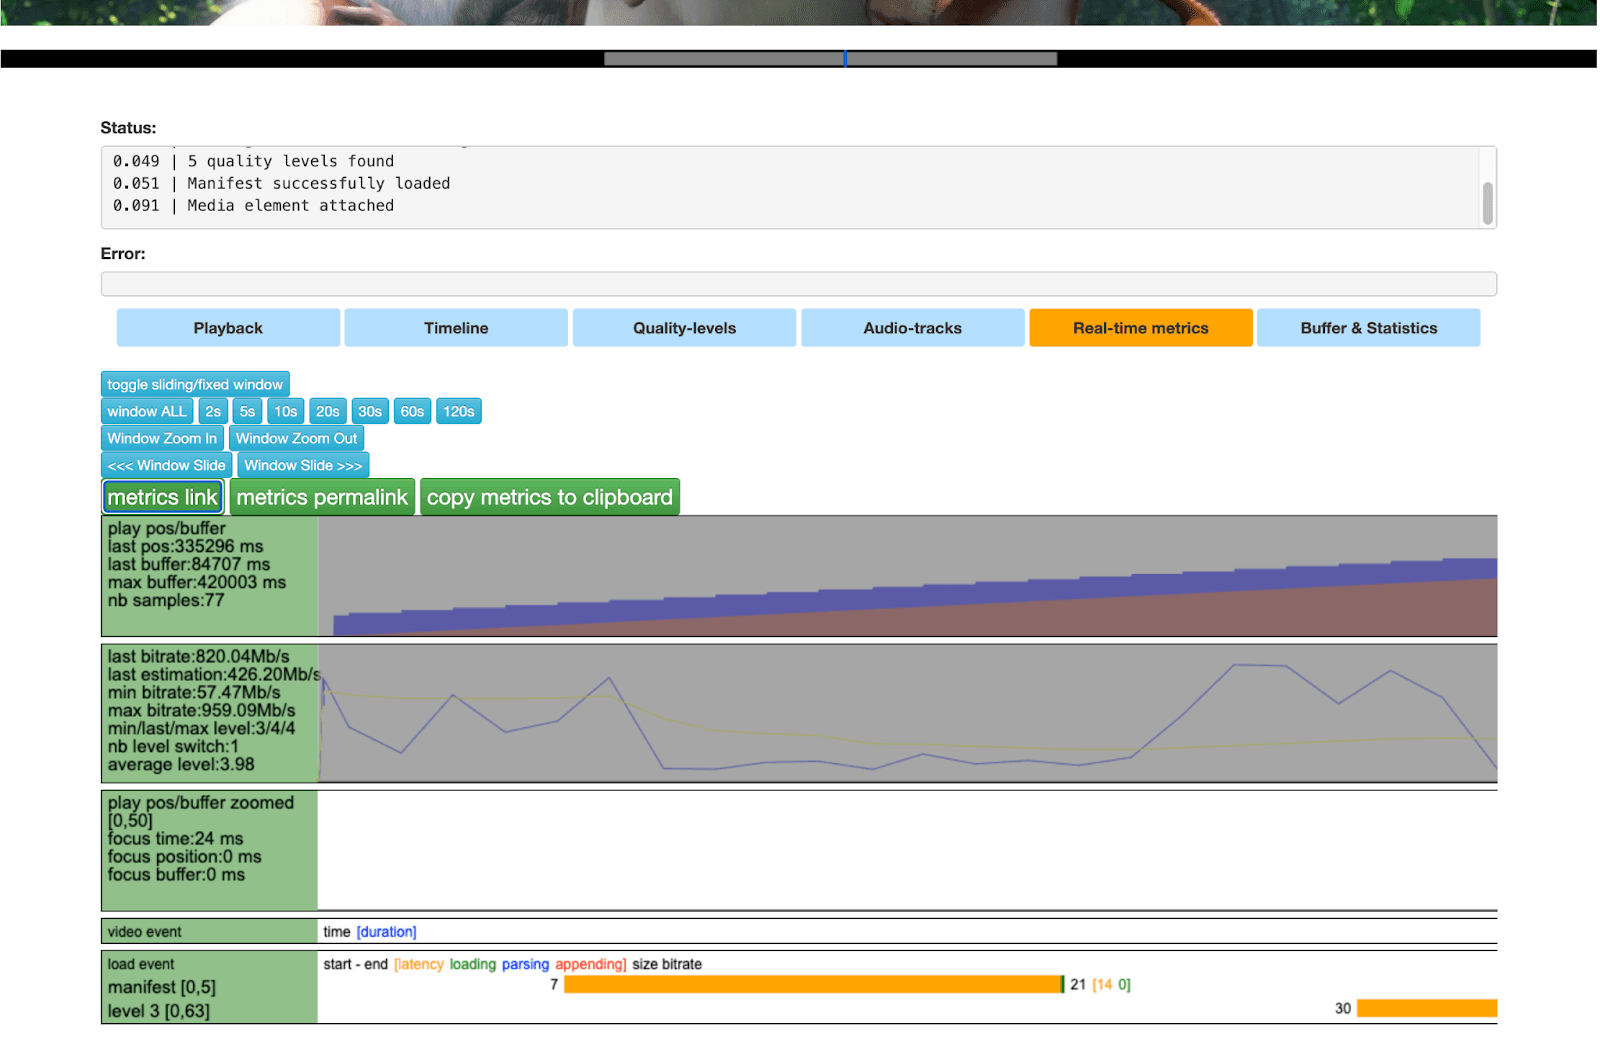
hls.js — This is a free online tool for testing HLS playback in the browser using hls.js, a widely known JavaScript library for working with HLS. It allows analyzing adaptive bitrate switching, checking playback stability, and viewing detailed logs of buffering and errors. For example, when playing HLS streams, you can track buffer filling in the Timeline tab.

If you go to the next tab "Quality-levels", you can select the bitrate in which you want to play your HLS stream.

The "Audio-tracks" tab provides information about all available audio tracks for your HLS stream. The next tab "Real-time metrics" is the most informative and allows analyzing metrics about bitrates, buffer, video or audio events, and more.
The last tab "Buffer & Statistics" mainly displays statistics and contains useful information such as: Dropped frames, Corrupted frames, TTFB Estimate, Bandwidth Estimate, and other general statistics.
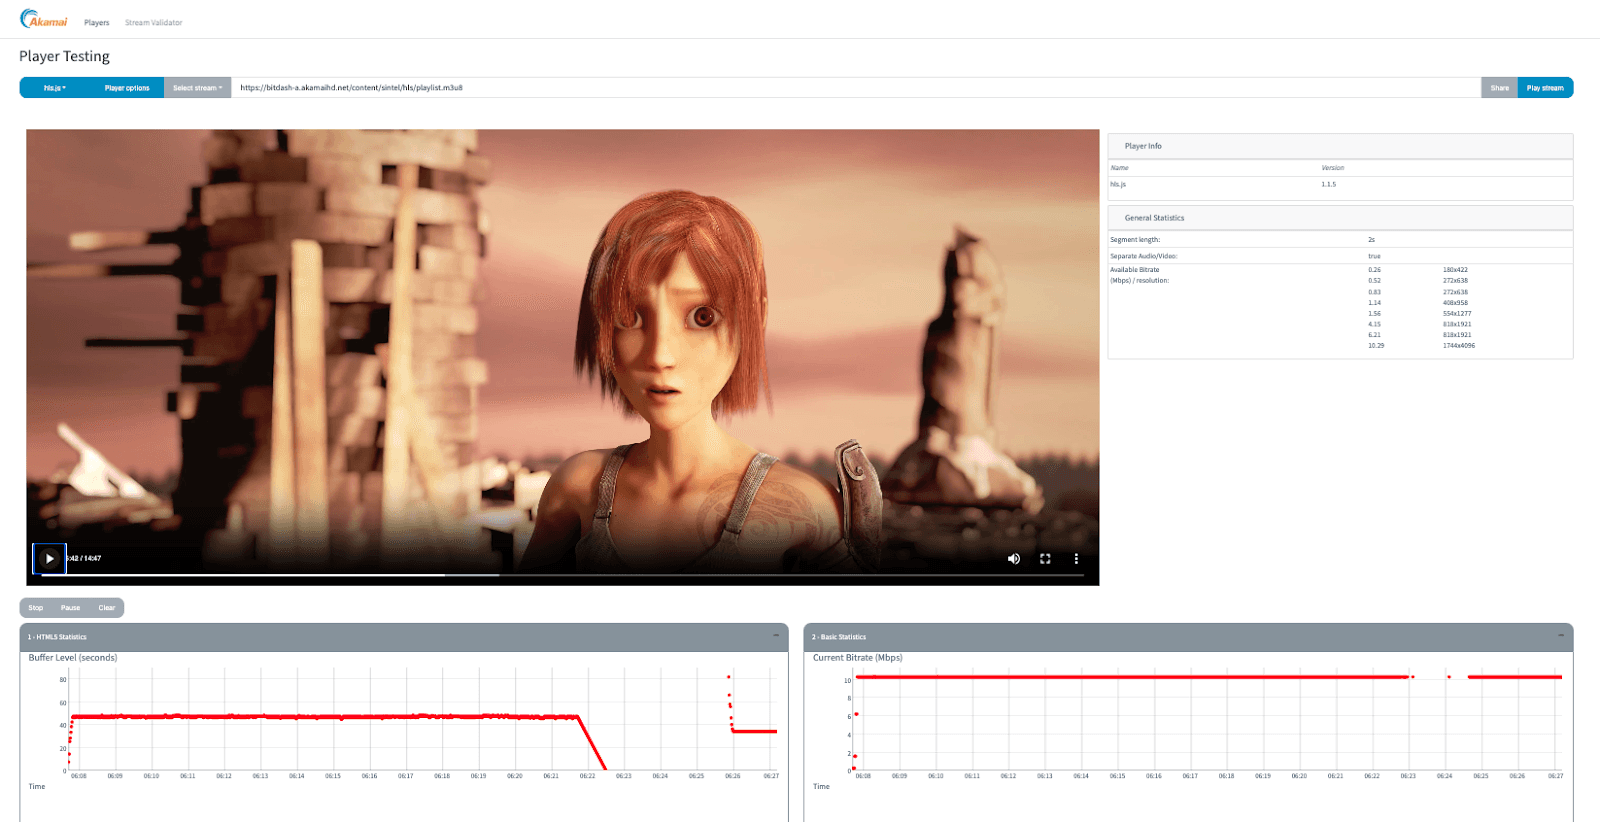
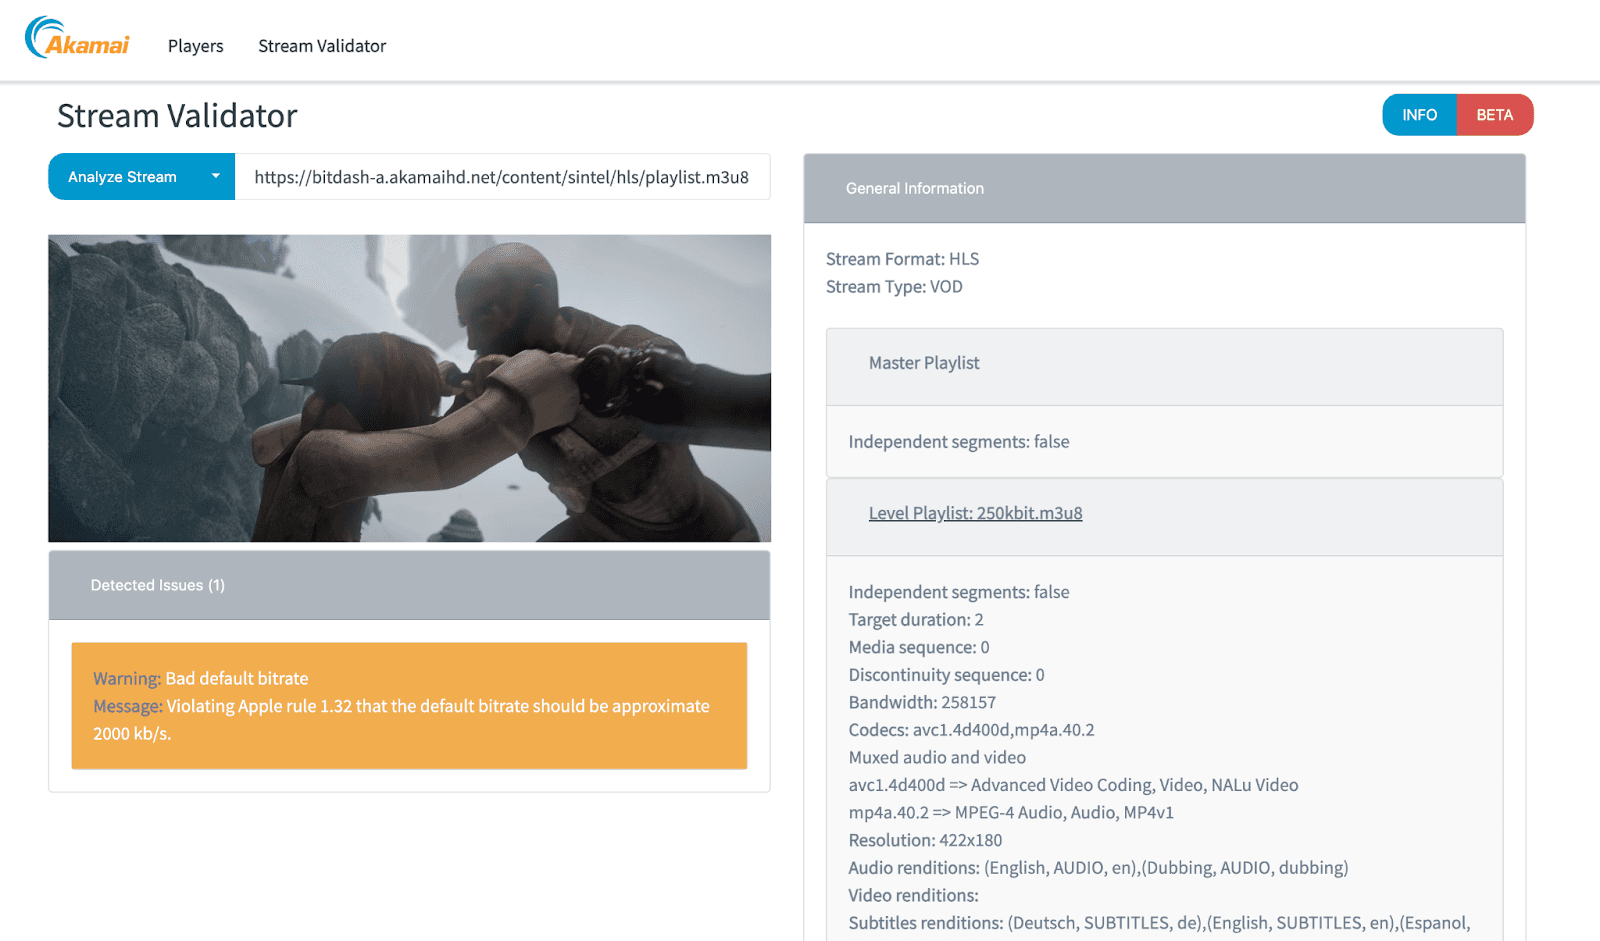
Akamai Player and Stream Validator — This is a tool for testing and analyzing HLS streams that works in conjunction with Akamai HLS.js Player. It allows checking stream quality in real-time, detecting problems with buffering, delays, and adaptive bitrate. The following image shows what the player looks like and what options it has.
The stream validator not only catches errors in the stream and inconsistencies according to the HLS specification but also additionally displays general information about playlists and media files.
Shaka Player — A powerful player for DASH developed by Google, but can also be used for playing and testing HLS.
Native HLS Playback — This is a browser extension that acts as a wrapper for the hls.js player. This extension allows playing any HLS stream embedded as an HTML element on the current page.
There are many more online players that allow playing HLS, so you always need to choose the one that suits your needs.
Also, I would like to note that any playback testing should be accompanied by recording HTTP traffic to gather as much information as possible about the HLS stream in case of any anomaly. To record traffic from native devices, you can use Charles Proxy, and when playing a stream in the browser, you can use DevTools.
Performance Testing
Finally, we come to the section on performance testing, which is the main stage of server-side HLS testing. There are many tools and extensions for performance testing, but today I would like to focus on the HLSPlugin for JMeter. This plugin provides a powerful toolkit for simulating a large number of users requesting streaming video, allowing you to evaluate how the server side handles the load and scales when processing a large number of requests.
The following image shows what the sampler configuration looks like in this plugin.

The settings allow you to select the protocol, bandwidth, audio tracks, subtitles, etc.
And this is what the result of executing this sampler looks like. It is important to note that the sampler downloads not only .m3u8 files but also media files with the .ts or .vtt extensions.
You can read more about installing the plugin and configuring the test here, but now let's focus more on the main steps in HLS performance testing.
The first step is to download m3u8 playlists that contain information about available stream variants with different video and audio quality. It is important to consider the server's response time to playlist requests, as this directly affects the speed of video streaming startup or TTFF. If testing is done with a small number of users, this will help establish a baseline response time under low load conditions. This data can be used as a starting point for comparing results at different load levels. However, for a quick start, the recommended response time should be within 200 milliseconds.
The next step is to process and download segments, which simulates the process of a video player downloading content. This load mainly falls on the CDN, but it is necessary to check the system's resilience to high loads. This can also be useful for optimizing performance to assess how efficiently the CDN manages caching and delivering video segments to minimize delays.
Overall, for adequate HLS performance testing, it is important to define and measure metrics that will help evaluate how effectively the system can handle large volumes of traffic and provide quality video to users. I would consider the following metrics to be the most key:
Server Response Time: Measures the time it takes for the server to respond to a client request. It is measured in milliseconds and is an important factor in the interaction between the client and the server.
Throughput: The process of measuring the number of requests the system can process during a given period for data processing. Simply put, throughput is the number of transactions the system can process in a given period.
Segment Download Time: Measures how long it takes to download each video segment. Optimal download time is critical for ensuring smooth playback without delays and buffering.
Maximum Concurrent Users: Shows how many users the system can serve simultaneously before noticeable performance problems occur. This is a key indicator of HLS server scalability.
HTTP Request Error Rate: The percentage of errors in HTTP requests successfully processed by the server. A high error rate may indicate problems with the server or excessive load.
Startup Time: The time required to start playing the video after the user's request. This is important for ensuring an excellent user experience, especially in the case of live streaming.
Also, during performance testing, server resource usage is usually monitored, including CPU, memory, disk space, and network load. Ensuring optimal resource usage helps prevent server overload and crashes.
In conclusion, HLS performance testing is an important step in ensuring stable operation of streaming services under various load conditions.
Conclusion
Testing HLS is a complex process that requires attention from analyzing HLS streams and media files to thorough monitoring of playback on different players and devices, including performance testing. Testing technologies and tools may vary, as may the testing approach. The most important thing is that the testing team clearly understands which approaches and tools will be most relevant in their specific case.
Hope you found this helpful. Thanks for your time!
Hello everyone! Following the publication of my first article, I’m back today to cover media file testing. We’ll explore using FFprobe integrated with ChatGPT for analysis, as well as playback and performance testing. Let’s dive right in!
Testing media files
Testing media files, such as .ts (Transport Stream) and .vtt (WebVTT), is often performed using tools such as FFprobe or MediaInfo. These tools allow detecting errors in files that can affect the quality and stability of streaming.
Here are the key aspects that can be checked and analyzed using FFprobe:
Stream Information
Video Streams: Codec type (e.g., H.264), resolution, frame rate, pixel format, and aspect ratio.
Audio Streams: Codec type (e.g., AAC), sampling rate, number of channels, and language metadata.
Subtitle Streams: Format and language, if available.
To obtain stream information, you can run the command:
ffprobe -v error -show_streams input.ts
Overall Integrity of the .ts Media File
Total duration of the media segment, bitrate, and size.
Container-level metadata, such as encoder and creation time.
Command to obtain integrity information:
ffprobe -v error -show_format input.ts
Frame-level Analysis
Presentation timestamps (PTS) and decoding timestamps (DTS).
Frame types (I-frames, P-frames, B-frames) and their sequence.
Command to obtain detailed frame information:
ffprobe -v error -select_streams v:0 -show_frames input.ts
Packet-level Analysis
Packet sizes and timestamps.
Efficiency of stream packetization. Command to check packets:
ffprobe -v error -show_packets input.ts
These are just some of the commands you can run for media files using FFprobe. This tool also allows working with almost all types of media files, making it versatile for media testing.
In automated tests, FFprobe can be used in two ways: write your own executor to call the console utility and parse its output, or use ready-made wrappers that provide a convenient interface for working with FFprobe.
Here is an example of a wrapper called ffmpeg-cli-wrapper, which can be used when writing tests in Java. It allows doing everything the console application does.
Here is an example of its usage:
FFprobe ffprobe = new FFprobe("/path/to/ffprobe");
FFmpegProbeResult probeResult = ffprobe.probe("input.mp4");
FFmpegFormat format = probeResult.getFormat();
System.out.format("%nFile: '%s' ; Format: '%s' ; Duration: %.3fs",
 format.filename,
 format.format_long_name,
 format.duration
);
FFmpegStream stream = probeResult.getStreams().get(0);
System.out.format("%nCodec: '%s' ; Width: %dpx ; Height: %dpx",
 stream.codec_long_name,
 stream.width,
 stream.height
);
This example shows how to use FFprobe through ready-made wrappers, simplifying the process of integration and automation of tests. Overall, with such approaches, you can quickly obtain the necessary information about HLS streams and media files, analyze their structure, detect possible errors, and ensure compliance with specifications.
Analyzing Playlists and Media Files Using ChatGPT Integration
Earlier this year, after attending one of the AI conferences, I had the idea to send manifests for verification to ChatGPT. I created a project called hls-ai-analyzer, which I recently uploaded to GitHub. With this project, I want to show how to integrate with the ChatGPT API and send it m3u8 playlists and the results of FFprobe execution for media files to check them for anomalies.
While working on this project, I noticed that ChatGPT works most effectively when given clear and detailed instructions. In my case, the instruction looks like this:
"You are a video streaming analysis program for HLS and DASH. You have to analyze streaming files and find all sorts of anomalies. Use standard RFC-8216 for validation. If you do not find anomalies, then I expect a response: {“status”: “OK”, “message”: “Manifest is correct”}. If you found anomalies, then I expect a response: {“status”: “FAIL”, “message”: “[Add here information about what is wrong in a stream in 200 symbols]”
For me, it was important for ChatGPT to return a response in JSON format so that I could easily map it to an object in Java, so in the instruction, I explicitly stated what response I expect. Such analyzers can then be customized for any needs and tasks. For example, you can try to direct it to a LIVE stream and modify the code to load m3u8 playlists every 5 seconds, download media files, and send all this data to the ChatGPT API for anomaly checking. This approach can allow analyzing streams in real-time, which can help catch complex defects or anomalies.
However, even with automated tests or integration with AI for stream verification, I would still recommend checking playback using different players, which we will discuss next.
Playback Testing
Playback testing involves checking the playback of HLS streams on different devices and browsers. The main goal is to ensure playback stability, adaptability to changing network conditions, and correct content display according to HLS specifications.
Let's consider the main aspects of testing HLS stream playback:
Playback on Different Devices and Platforms
Testing on web browsers (Chrome, Firefox, Safari, Edge).
Testing on mobile devices (iOS, Android).
Testing on Smart TVs, gaming consoles, etc.
ABR (Adaptive Bitrate Streaming)
Check how the video player adapts the stream quality when the internet connection speed changes.
Measure the time it takes to switch between bitrates and its impact on the user experience.
Startup Time and Buffer Loading
Measure the time to display the first frame when starting the video (TTFF).
Check buffering under different network conditions and loads.
Calculate the delay from the original stream in the case of live streaming.
Playback Stability and Error Resilience
Recovery of playback after connection loss or temporary network degradation.
Check behavior in case of failed segment download or HTTP request errors.
Subtitles and Alternative Audio Tracks
Check the correct display of WebVTT (.vtt) subtitles.
Analyze the quality of subtitle placement on the screen.
Check switching between different languages/audio tracks.
DRM (Digital Rights Management) Testing
Check the process of obtaining and processing license keys, including the response time of DRM servers.
Check playback restrictions (e.g., screenshot or screen recording prohibition) according to content security policies.
Analyze player behavior in case of DRM errors, such as the absence of a license or its expiration.
Playback testing of HLS streams is usually performed on the applications being developed, but there are also several players that can help. Let's consider some of them:
hls.js — This is a free online tool for testing HLS playback in the browser using hls.js, a widely known JavaScript library for working with HLS. It allows analyzing adaptive bitrate switching, checking playback stability, and viewing detailed logs of buffering and errors. For example, when playing HLS streams, you can track buffer filling in the Timeline tab.
If you go to the next tab "Quality-levels", you can select the bitrate in which you want to play your HLS stream.
The "Audio-tracks" tab provides information about all available audio tracks for your HLS stream. The next tab "Real-time metrics" is the most informative and allows analyzing metrics about bitrates, buffer, video or audio events, and more.
The last tab "Buffer & Statistics" mainly displays statistics and contains useful information such as: Dropped frames, Corrupted frames, TTFB Estimate, Bandwidth Estimate, and other general statistics.
Akamai Player and Stream Validator — This is a tool for testing and analyzing HLS streams that works in conjunction with Akamai HLS.js Player. It allows checking stream quality in real-time, detecting problems with buffering, delays, and adaptive bitrate. The following image shows what the player looks like and what options it has.
The stream validator not only catches errors in the stream and inconsistencies according to the HLS specification but also additionally displays general information about playlists and media files.
Shaka Player — A powerful player for DASH developed by Google, but can also be used for playing and testing HLS.
Native HLS Playback — This is a browser extension that acts as a wrapper for the hls.js player. This extension allows playing any HLS stream embedded as an HTML element on the current page.
There are many more online players that allow playing HLS, so you always need to choose the one that suits your needs.
Also, I would like to note that any playback testing should be accompanied by recording HTTP traffic to gather as much information as possible about the HLS stream in case of any anomaly. To record traffic from native devices, you can use Charles Proxy, and when playing a stream in the browser, you can use DevTools.
Performance Testing
Finally, we come to the section on performance testing, which is the main stage of server-side HLS testing. There are many tools and extensions for performance testing, but today I would like to focus on the HLSPlugin for JMeter. This plugin provides a powerful toolkit for simulating a large number of users requesting streaming video, allowing you to evaluate how the server side handles the load and scales when processing a large number of requests.
The following image shows what the sampler configuration looks like in this plugin.
The settings allow you to select the protocol, bandwidth, audio tracks, subtitles, etc.
And this is what the result of executing this sampler looks like. It is important to note that the sampler downloads not only .m3u8 files but also media files with the .ts or .vtt extensions.
You can read more about installing the plugin and configuring the test here, but now let's focus more on the main steps in HLS performance testing.
The first step is to download m3u8 playlists that contain information about available stream variants with different video and audio quality. It is important to consider the server's response time to playlist requests, as this directly affects the speed of video streaming startup or TTFF. If testing is done with a small number of users, this will help establish a baseline response time under low load conditions. This data can be used as a starting point for comparing results at different load levels. However, for a quick start, the recommended response time should be within 200 milliseconds.
The next step is to process and download segments, which simulates the process of a video player downloading content. This load mainly falls on the CDN, but it is necessary to check the system's resilience to high loads. This can also be useful for optimizing performance to assess how efficiently the CDN manages caching and delivering video segments to minimize delays.
Overall, for adequate HLS performance testing, it is important to define and measure metrics that will help evaluate how effectively the system can handle large volumes of traffic and provide quality video to users. I would consider the following metrics to be the most key:
Server Response Time: Measures the time it takes for the server to respond to a client request. It is measured in milliseconds and is an important factor in the interaction between the client and the server.
Throughput: The process of measuring the number of requests the system can process during a given period for data processing. Simply put, throughput is the number of transactions the system can process in a given period.
Segment Download Time: Measures how long it takes to download each video segment. Optimal download time is critical for ensuring smooth playback without delays and buffering.
Maximum Concurrent Users: Shows how many users the system can serve simultaneously before noticeable performance problems occur. This is a key indicator of HLS server scalability.
HTTP Request Error Rate: The percentage of errors in HTTP requests successfully processed by the server. A high error rate may indicate problems with the server or excessive load.
Startup Time: The time required to start playing the video after the user's request. This is important for ensuring an excellent user experience, especially in the case of live streaming.
Also, during performance testing, server resource usage is usually monitored, including CPU, memory, disk space, and network load. Ensuring optimal resource usage helps prevent server overload and crashes.
In conclusion, HLS performance testing is an important step in ensuring stable operation of streaming services under various load conditions.
Conclusion
Testing HLS is a complex process that requires attention from analyzing HLS streams and media files to thorough monitoring of playback on different players and devices, including performance testing. Testing technologies and tools may vary, as may the testing approach. The most important thing is that the testing team clearly understands which approaches and tools will be most relevant in their specific case.
Hope you found this helpful. Thanks for your time!
Frequently asked questions
Frequently asked questions
Frequently asked questions
How do you analyze HLS media files?
We use FFprobe, a command-line tool from the FFmpeg suite. It extracts deep metadata—such as resolution, bitrate, and codec details—from individual video segments (.ts files) to verify they match the specifications listed in the manifest.
How can ChatGPT assist in HLS testing?
ChatGPT can be used to analyze FFprobe outputs. Instead of manually combing through thousands of lines of JSON output, engineers can feed the data to ChatGPT to instantly identify anomalies, codec mismatches, or irregular bitrates.
What tools are best for validating playback?
For playback validation, we recommend the HLS.js, Akamai Stream Validator, and Shaka Player. These tools visualize critical metrics like buffer health and bitrate switching in real-time, which standard video players hide
What metrics define HLS performance?
The most critical metrics are Time to First Frame, Rebuffering Ratio (how often it stalls), and Bitrate Switching Latency (how quickly the player adapts to network changes).
Why combine FFprobe with AI automation?
Manual testing of every segment in a long stream is impossible. By combining FFprobe's data extraction with AI analysis, engineers can achieve 100% coverage of the stream's assets rather than relying on random spot checks.
Serhii Romanov
SDET Manager
Software Test Engineering Manager with 15+ years in video streaming and AI testing. Author of Frame by Frame and consultant for Pluto TV and Paramount Global. Focuses on AI-assisted testing and modernizing quality engineering for distributed media to ensure flawless, large-scale performance.
© 2026 Brightgrove. All rights reserved.
© 2026 Brightgrove. All rights reserved.
© 2026 Brightgrove. All rights reserved.
© 2026 Brightgrove. All rights reserved.